Friday, February 26, 2010

Friday Fragments- February 26, 2010

So, as you may have noticed I've been having a little PROBLEM in regards to blogging lately. Both in reading AND posting. I finally got through all ninteybillionty posts in my reader, but I was speed-scanning so if I missed something really important like you are moving to the moon or your dog had kittens please let me know!

I haven't been spending as much time on the computer as usual, but I haven't been accomplishing anything interesting either. Although, a few neat things have happened recently.

I've gone and found myself some volunteer work. It's just one day a week for three hours, but it gives me AMPLE time to practice my Dutch. Plus I was able to get lots of the signatures I need to finish up my "integration portfolio." I'm working in a verpleeghuis, which is a nursing home. The place is this enormously gigantic complex with different levels of care. I'm back in quiet little bungalow style accommodations with some residents who have mild dementia, are very very old, or have had strokes or other neurologically damaging things happen. I'm there during lunch so I help with meal prep, table setting, feeding, and cleaning up among other things. Today was my second day and it seems to be going well so far.

Picture 3320

My amaryllis finally bloomed. The blossoms are dying a little bit now, but I wasn't sure it was going to bloom at all this year! Hopefully the tulips and daffodils will start blooming soon too. I've had enough of winter. Spring will undoubtedly be soggy, but at least it won't be so stinking COLD!

Amaryllis Blooms

I've been trying to find plane tickets for our trip to the US this summer and I'm thinking of selling organs to fund the trip. Anyone need a kidney or a piece of my liver?

Someone made a sock monkey out of Legos. I'm impressed.

Lego Sock Monkey

Speaking of sock monkeys, I've been working on a super secret project. If I don't die of sheer frustration before I finish, I shall hopefully be unveiling it in the next week or two. Now aren't you all curious and excited? Oh, well... you SHOULD be!

*****
Thank you thank you to Mrs 4444 for being our lovely Friday Fragments host!

Mommy's Idea

Thursday, February 25, 2010

Fabulous Fabric Fair*

*It's not really a "fair," but I'm trying to keep the alliteration going, so just pretend.

For a city of it's size, Eindhoven doesn't seem to have a lot of fabric stores. I can only think of a couple. To make up for this though, we have a weekly fabulous fabric market fair on Tuesday in the city center. This is way better than a measly fabric store!

There are rows...
fabricmarket1

and rows...
fabricmarket2

and rows...
Tuesday Fabric Market

Need some denim? Here, how about a selection of about a zillion different types!
Tuesday Fabric Market

Oh, you don't need denim? Well, here's another selection of goodies to peruse. I kinda like the banana fabric personally, thought I'm not sure what I'd use it for. Maybe an apron.

Fabric Market Collage

*****
I'm participating in Mrs. Matlock's Alphabe-Thursday! I wonder how many other folks used Fabric for their F... Click the link below to see!

Jenny Matlock

Wednesday, February 24, 2010

Salmon Cakes & Strawberry Shortcake

We had a combination of chefs this week since they each had very few recipes. I wasn't really able to find a Masaharu Morimoto recipe that looked appealing to me, but I did try a recipe each from Melissa d'Arabian and Mary Nolan.

I'll start with the main course- Salmon Cakes.

Salmon Cakes

Salmon Cakes
Courtesy of Melissa d'Arabian

Ingredients:
  • 2 strips bacon, cooked until crispy and crumbled, reserve the fat
  • 1/4 cup chopped onion
  • 1 egg
  • 1/2 cup mayonnaise
  • 2 tsp Dijon mustard
  • 1/2 tsp sugar
  • 1/2 lemon, zested
  • 1 (14 ounce) can wild salmon, checked for large bones (I've only had one previous experience with canned salmon and it was really terribly unappetizing so I splurged and bought the "no skin and bones" salmon)
  • 1 baked or boiled russet potato, peeled and fluffed with a fork
  • 1/4 cup bread crumbs (I used herbed bread crumbs because that's what I had handy)
  • 2 tbsp grated Parmesan
  • 1/2 cup vegetable oil*
Heat 1 tablespoon of the reserved bacon fat in a small saute pan over low heat. Add the onions and cook until translucent. Cool the onions for a bit.

Mix the bacon, onion, egg, mayonnaise, mustard, sugar, and lemon zest in a bowl. Add the salmon and potato, mixing gently after each addition. Form the mixture into 12 small patties.

*Okay, at this point I knew something was not "right" with this recipe. I had salmon soup, not something that would be able to be formed into patties. I mixed in some instant potatoes to thicken it up a little, but they still weren't really formable so I decided to scoop the mixture into my muffin pan and bake them instead. I sprinkled some bread crumbs over the top of each "cake" and then grated a little Parmesan onto each. I baked them for about 20 minutes at 175 C (350 F). Below are Melissa's instructions if you have better success than me and want to fry them.

In a shallow dish, combine the bread crumbs, Parmesan, and pepper, to taste. Coat the patties in the bread crumb topping. Heat 1/4 cup of the oil in a large saute pan over medium heat, and cook the salmon cakes in batches until golden, about 3 to 4 minutes per side. Add more oil, as necessary. Arrange on a serving platter and serve.

The Verdict: These tasted FANTASTIC! We both thought they were really good and I was glad I figured out a way to salvage the recipe. I'm going to try it with tuna and see what happens with that.

*****

Strawberry Shortcake

For dessert I made Mary Nolan's Strawberry Shortcake. I'm not going to post the recipe because to be honest I wasn't -that- enamored with it. It tasted good, but I don't think I'd use that shortcake recipe again. It was a bit too dense. The addition of the lemon zest to the whipped cream was genius though. I'll do THAT part again.

Thursday, February 18, 2010

Exceptionally Evil Elevator (of DOOM)

For starters, I need to come clean about Martijn's Deadly Man Flu. I may have Exaggerated a little bit. He really did have deadly man flu, but he was only being dramatic because when he was sick the time before I was teasing him about not treating illness like a "typical man."

Now that we've gotten that out of the way, we're onto E.

When I asked Martijn what he thought I should write about for E, he started spewing out a rather strange list.
  • Eggheads
  • Eggplant-recipes
  • Edible stuff
  • Electric Locomotives
  • Elevators
  • Elusive mythical beast
  • Engelbert Humperdink
  • Epistle of James
Epistle of James? Really? It's not even REALLY an E! The list wasn't completely useless though. I decided to share with you my Exceptionally Evil Elevator (of DOOM)!


I also rather like the warning sticker.

Elevator Warning Sign

It says "WATCH OUT! Scary elevator of doom doesn't have safety doors that would enclose the entire elevator instead of only just three sides."*

Still, I'd rather take the scary elevator than mountain climb up 9 flights of steep narrow Dutch stairs 4 times a day.

*Not a direct translation, but that's really what it means.

*****
I'm participating in Jenny Matlock's Alphabe-Thursday!

Jenny Matlock

Wednesday, February 17, 2010

Tagliatelle with Pancetta and Parsnips

Mario Batali has TONS of amazing looking recipes. For this week's FNCCC I chose Tagliatelle with Pancetta and Parsnips.

Talligate with Parsnips

Tagliatelle with Pancetta and Parsnips
Courtesy Mario Batali

Ingredients:
  • 1 recipe basic pasta dough, recipe follows
  • Kosher salt
  • 1/4 pound pancetta, or good quality bacon, cut into 1/2-inch cubes (The only pancetta I could find was in really really thin slices, but I think that actually worked better than if it had been in chunks)
  • 1 tablespoon unsalted butter (I skipped this and just used the bacon grease instead)
  • 1/2 pound parsnips, peeled, halved, and cut into 1/4-inch half moons (omit the thickest part of the ends)
  • Freshly ground black pepper
  • 1 bunch flat-leaf parsley, finely chopped to yield 1/4 cup
  • Parmigiano-Reggiano, for serving
Directions:
Roll out the pasta dough to the thinnest setting on a pasta machine (flea market find for €3). Cut the dough crosswise into 1/4-inch strips (I just used the cutter on my machine). Place the tagliatelle on a sheet tray that has been dusted with semolina flour (which I strangely actually had in the cupboard), cover with a clean dish towel, and set aside until ready to use.

Bring 6 quarts of water to a boil and add 2 tablespoons of salt (or, ya know, fill up the pan and just dump in some salt).

In a 12 to 14-inch saute pan, cook the pancetta over high heat until it is browned and the fat has been rendered, about 10 minutes. Add the butter (skipped) and parsnips and saute over high heat without shaking the pan too much until they are golden brown and slightly crispy, 5 to 6 minutes. Season, to taste, with salt and pepper, add the parsley, and cook 1 minute longer.

Cook the tagliatelle in the boiling water until tender yet al dente, about 2 minutes. Drain the pasta, reserving some of the cooking water, and add the pasta to the pan with the pancetta and the parsnips. Toss over high heat to coat the pasta, adding pasta cooking water if necessary to keep the sauce form getting too tight (I ended up using about 1/2 a cup of the pasta water for a 1/2 batch of this recipe). Divide equally among 4 heated pasta bowls, grate Parmigiano-Reggiano over the top of each bowl, and serve immediately.

Basic Pasta Dough
(I halved the recipe for 2 people)

3 cups unbleached all purpose flour, plus more, as needed (I used a 2:1 ratio of whole wheat flour and white flour)
4 extra-large eggs

Mound 3 cups of flour in the center of a large wooden cutting board. Make a well in the middle of the flour, add the eggs. Using a fork, beat together the eggs and begin to incorporate the flour starting with the inner rim of the well. As you incorporate the eggs, keep pushing the flour up to retain the well shape (do not worry if it looks messy). The dough will come together in a shaggy mass when about half of the flour is incorporated. (I think this is a lie. It doesn't come together in a shaggy mass when about half the flour is incorporated so I picked it up and kneaded it with my hands until it was a ball)

Start kneading the dough with both hands, primarily using the palms of your hands. Add more flour, in 1/2-cup increments, if the dough is too sticky (sticky was not a problem). Once the dough is a cohesive mass, remove the dough from the board and scrape up any left over dry bits. Lightly flour the board and continue kneading for 3 more minutes (by this time the dough was so dry I was worried I would have a disaster if I didn't intervene. I wet my hands several times as I was kneading to incorporate a little moisture but not so much that I ended up with a soggy goopy mess). The dough should be elastic and a little sticky. Continue to knead for another 3 minutes, remembering to dust your board with flour when necessary. Wrap the dough in plastic wrap and set aside for 20 minutes at room temperature. Roll and form as desired.

Note: Do not skip the kneading or resting portion of this recipe, they are essential for a light pasta.

The Verdict: I loved everything about this recipe. The slight sweetness of the parsnips went really well with the pancetta and the modified pasta was even good! If you needed a really quick dinner I'd just use ready made pasta. Four thumbs up for this one.

Sunday, February 14, 2010

Daring Cooks Challenge: Mezze Table

The 2010 February Daring Cooks challenge was hosted by Michele of Veggie Num Nums. Michele chose to challenge everyone to make mezze based on various recipes from Claudia Roden, Jeffrey Alford and Naomi Dugid.

The challenge is to prepare a Mezze (pronounced “mez-ay", although many people seem to pronounce it as "mezz”) Table including, but not limited to, homemade Pita bread and Hummus. If you’re not familiar with mezze, it’s more of a style of eating than a specific recipe or recipes. Mezze is a bunch of small dishes served all at once—sort of like the Middle Eastern version of Spanish Tapas. It can be served as appetizers before a meal, or as the meal itself.

Homemade Pitas

Pita Bread – Recipe adapted from Flatbreads & Flavors by Jeffrey Alford and Naomi Duguid

Prep time: 20 minutes to make, 90 minutes to rise and about 45 minutes to cook

Ingredients:

2 teaspoons regular dry yeast
2.5 cups lukewarm water
5-6 cups all-purpose flour (may use a 50-50 combo of AP & whole wheat)
1 tablespoon salt
2 tablespoons olive oil

Directions:
  1. In a large bread bowl, sprinkle the yeast over the warm water. Stir to dissolve. Stir in 3 cups flour, a cup at a time, and then stir 100 times, about 1 minute, in the same direction to activate the gluten. Let this sponge rest for at least 10 minutes, or as long as 2 hours.
  2. Sprinkle the salt over the sponge and stir in the olive oil. Mix well. Add more flour, a cup at a time, until the dough is too stiff to stir. Turn it out onto a lightly floured surface and knead for 8 to 10 minutes, until smooth and elastic. Rinse out the bowl, dry, and lightly oil. Return the dough to the bowl and cover with plastic wrap. Let rise until at least doubled in size, approximately 1 1/2 hours.
  3. Place a pizza stone, or two small baking sheets, on the bottom rack of your oven, leaving a 1-inch gap all around between the stone or sheets and the oven walls to allow heat to circulate. Preheat the oven to 450F (230C).
  4. Gently punch down the dough. Divide the dough in half, and then set half aside, covered, while you work with the rest. Divide the other half into 8 equal pieces and flatten each piece with lightly floured hands. Roll out each piece to a circle 8 to 9 inches in diameter and less than 1/4 inch thick. Keep the rolled-out breads covered until ready to bake, but do not stack.
  5. Place 2 breads, or more if your oven is large enough, on the stone or baking sheets, and bake for 2 to 3 minutes, or until each bread has gone into a full balloon. If for some reason your bread doesn't puff up, don't worry it should still taste delicious. Wrap the baked breads together in a large kitchen towel to keep them warm and soft while you bake the remaining rolled-out breads. Then repeat with the rest of the dough.

I had to get a little creative with how to bake these for a couple of reasons. My oven only goes up to 225 and it doesn't hold the temperature as well as one might hope. Secondly, it's a combi unit and only has one shelf, so the bottom rack is really in the middle of the oven. Finally, I don't have a baking stone. I was determined to make it work though and got a lot of good advice from Audax and cuppy. I put a pan of water in the bottom to help keep the temperature, and I kept it on the "preheat" setting the whole time they were baking (which keeps the broiler/grill on).

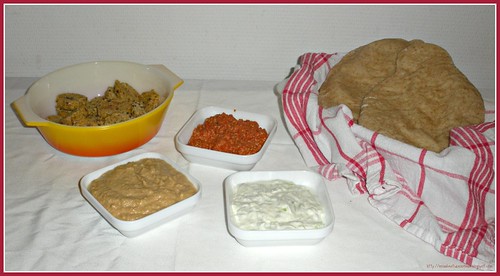
Next I did the goodies to serve with the pitas.

Mezze

Hummus – Recipe adapted from The New Book of Middle Eastern Food by Claudia Roden

Prep Time: Hummus can be made in about 15 minutes once the beans are cooked. If you’re using dried beans you need to soak them overnight and then cook them the next day which takes about 90 minutes.

Ingredients:

1 1/2 cups dried chickpeas, soaked in cold water overnight (or use 1 10 ounce can)
2 lemons, juiced
2-3 garlic cloves, peeled and crushed
big pinch of salt
4 tablespoons tahini (sesame paste) OR use peanut butter or any other nut butter

Directions:
  1. Drain and boil the soaked chickpeas in fresh water for about 1 ½ hours, or until tender. Drain, but reserve the cooking liquid.
  2. Puree the beans in a food processor (or you can use a potato masher) adding the cooking water as needed until you have a smooth paste.
  3. Add the rest of the ingredients and mix well. Adjust the seasonings to taste.

Roasted Pepper and Walnut Dip from veggienumnums.com

Ingredients:

4 large bell peppers
1 cup finely chopped walnuts
4 cloves garlic
salt
juice of 1/2 to 1 lemon
1 tablespoon extra virgin olive oil
pinch of chili pepper

Roast the peppers by turning them under the broiler or in the hottest oven until their skins blacken and blister, then skin them and remove the seeds. Blend the peppers to a paste in the food processor, add the rest of the ingredients, and blend very briefly.

Tzatziki
Ingredients:

1 cup thick Greek yogurt
2-3 cloves garlic, minced.
1/2 cup seeded and minced (or grated) cucumber
1/4 tsp salt

Mix ingredients and let sit for a few hours in the fridge. Add salt to taste.
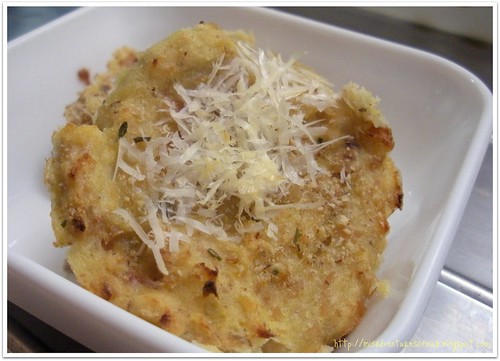
Baked Falafel
(Click the link to see the recipe.)

*****

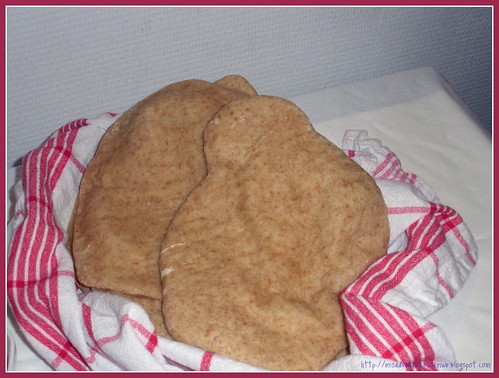
This was a fun challenge. I was really worried about the pitas but they actually worked out really well! I used the 50/50 combo of ap flour and whole wheat flour. They were nice and fluffy and even though they didn't puff up as impressively as I've seen some they DID puff enough. The recipe is huuuuuge though, so I think I'll halve it next time.

I used peanut butter in the hummus (I know, I know, it's not authentic that way). I've made it with tahini in the past and I guess I just don't like sesame paste. The pepper and walnut dip was really nice too! The tzatziki and falafel recipes were my own and complimented the other goodies quite well.

I think my favorite part of The Daring Kitchen is the recipes are things I probably wouldn't try otherwise. I HAVE tried to make pitas before but they were hockey pucks of awful horror and went in the trash. I couldn't salvage them. This gave me the opportunity to try again and to troubleshoot some of the issues that I think I had the last time.

Thanks for the challenge Michele!

Thursday, February 11, 2010

Deadly Man Flu

We had an outbreak of Deadly Man Flu this weekend.

Deadly Man Flu

For those of you not in the know, Deadly Man Flu is defined as:


The condition shared by all males wherein a common illness (usually a mild cold) is presented by the patient as life-threatening.


This is also known as 'Fishing for Sympathy' or 'Chronic Exaggeration'.


When the patient is your boyfriend or husband, he will exhibit the standard symptoms (such as an overwhelming desire for compassion) while simultaneously rejecting any and all efforts you make to placate him.
You: Awww, you poor fella.
Him: I'm DYING!
You: (Soothingly) Oh, you're not dying Cy.
Him: (Indignant) I AM! I have Man Flu!
You: Do you need some sympathy?
Him: Yes! But no one understands my pain...
You: I understa-
Him: NO YOU DO NOT!!! NO ONE UNDERSTAAAAANDS MY PAAAAAAAIN!"


I don't really think Deadly Man Flu is just a man disease though. I feel like crap... AND NO ONE UNDERSTANDS MY PAAAAIN!

*****
I'm adding this post to Jenny Matlock's Alphabe-Thursday! Stay tuned next week for "Explotation of" and "Exaggerating about" your husband to make for funnier or more interesting blog posts.

Jenny Matlock

Wednesday, February 10, 2010

Jamie Oliver's Lyonnaise Potato Cake

The next stop in our FNCCC journey is Jamie Oliver. Several of his recipes looked good and several made me wonder how many billions of stores I'd have to go to in order to find all of the ingredients! I'd like to try his Homemade Tomato Ketchup at some point, but I had a big bag of potatoes that were on their way out and decided to try the Lyonnaise Potato Cake recipe instead.


Lyonnaise Potato Cake


Jamie's Lyonnaise Potato Cake
Courtesy Jamie Oliver

Ingredients
9 potatoes, peeled and thickly sliced
Olive oil
2 onions, sliced
Small handful thyme leaves
4 tablespoons balsamic vinegar
Salt and freshly ground black pepper

Directions

Preheat the oven to 400 degrees F (200 degrees/Gas 6).

Bring a large pan of water to the boil, add the potatoes, and parboil them for 3 to 4 minutes. Drain and set aside. Heat some olive oil in a pan and fry the onions gently with the thyme leaves until meltingly soft. Add the balsamic vinegar and remove from heat. Remove onions to a plate.

Using the same pan (no need to wash it), lay half the potatoes in the bottom and season with salt and pepper. Follow with the onions in 1 layer, seasoning again, then the rest of the potatoes. Bake in the preheated oven for about 45 minutes.

The Verdict: These were just okay. I did everything according to the instructions (with the exception of transfering things into a baking dish since none of my pans would actually FIT in my oven). They weren't gross but they weren't all that great, so I probably won't make them again. There are other ways to eat potatoes that I like better and I figure if I'm going to ingest the carbs I might as well enjoy them!

Sunday, February 07, 2010

Happy 101 Award

The lovely Sarah at I Blame My Mother gave me the Happy 101 Award!


Here's what I'm supposed to do:
Copy the award image into a post.
List 10 things that make you happy.
Tag 10 bloggers who brighten your day.
Put in a link to their blogs.
Notify the award receivers.
In no particular order, ten things that make me happy are :
  1. I have my bike back! It's quite a relief not to be reliant on public transport anymore.
  2. Snuggling with Martijn.
  3. Awesome hand-knit socks.
  4. Pickwick Minty Morroco Tea
  5. I'm going home to see my family in the summer!
  6. Finding awesome things at the thirft store for a good price
  7. Cooking new things and having them turn out really well
  8. lolcats
  9. Making stuff
  10. Late night chats with Martijn before we go to sleep.

Now for 10 bloggers that brighten my day!

Dina at 4 Lettre Words

Jenny at (the aptly named) Jenny Matlock

Julia at Brainella the Librarian

Amy at Happily Ever After

Valerie (& Henry) at Vonlipi's Favorites

Sonya at Home Cooking with Sonya

Connie at Meal Planning with Connie

Rebekah at Sabbath Supper

Jeanette at Sweet Jeanette

Courtney at Redheads Craft More Fun

Friday, February 05, 2010

Alphabe-Thursday: C is for Collection of Pyrex

The oh so funny Jenny Matlock has started up a new link-up called Alphabe-Thursday! I'm a little late to the game (as usual), but I'm going to jump into C and if I get extra ambitious then I can go back and do A & B.

Today's C is collection, my wee little Pyrex collection to be exact. I maybe should've saved this for "P" but I'm not patient enough for that.

letter P happYbirthday R blue squared circle E Vintage LEGO brick letter X

I was at the thrift store one day and came across this little beauty, and that's where it all started! I couldn't resist the orange and red. It was calling out at me "take me home!" So, I did.

Pyrex- Friendship pattern

Over the last couple of years I've slowly been building up my little collection piece by piece.

pyrex collage

Then last week I found THESE! I've never seen anything like them before, I just love the shape. They had three so I snatched them all up for €4.50.

Funky Triangle Pyrex Dishes

The first piece I showed you, along with a cute little red fridge dish are the only American Pyrex I have. Everything else is British, which would make sense seeing as how I'm rather close to Britain and rather unclose to the US. Still, I wouldn't mind stumbling over more of the colorful American pieces. I've decided that I don't like the rose pattern quite as much as some of the others, so as I find dishes that I like better I'm going to swap them out. They're great to cook in so I don't want to just get rid of them before I have something shiny to put in their place.

What do YOU collect?


This post is linking up to Alphabe-Thursday! Click on over for more C posts.

Jenny Matlock

Thursday, February 04, 2010

Homemade Peanut Butter Cups

It seems that the Dutch don't typically appreciate the delightful combination of peanut butter and chocolate. The result of this is that peanut butter cups are in rather short supply and when you can find them they're not cheap. Martijn loves them though and since he's been having busyness and stress at work I decided I'd make some for him. Luxe dark chocolate peanut butter cups! He better know that I love him.

Homemade Peanut Butter Cups

I didn't have individual paper cups, so mine might not be "authentic" with the ridged edges, but they tasted darn good if you ask me! Graham crackers are also something that I've only found in expensive expat shops, so you can crush up digestive biscuits or "Maria" cookies as a substitute. You can also use Dr Oetker's Mix voor Kruimelbodem which can be found in most supermarkets with the baking supplies.

Homemade Peanut Butter Cups
Makes about 24 mini cups

300 grams (10.5 ounces) chocolate (dark chocolate, milk chocolate, bars, chips, whatever you'd like to use)
85 grams (1/3 cup) peanut butter
30 grams (1/4 cup) finely crushed graham cracker crumbs
Powdered sugar, to taste

You'll also need mini muffin tins or mini muffin paper cups. I used little silicone ones so I could pop the little cups out.

Melt your chocolate and "paint" it onto the muffin cups with a new clean paintbrush or a little pastry brush. Make sure to give them a pretty substantial coating on the bottom since it will be the base and if it's too thin it'll break when you take the peanut butter cups out. Put them in the fridge for a good half hour so they can cool and harden.

While the chocolate cups are cooling, mix together the peanut butter and crumbs. Add sugar to taste. If you use sweetened peanut butter you won't need much. I think I used about 2 tablespoons for our unsweetened peanut butter. Roll the peanut butter mixture into little balls and place inside the chocolate cups. Finally, spoon more melted chocolate on top to completely cover the peanut butter.

Cool in the fridge for another half an hour and then enjoy!

Wednesday, February 03, 2010

Baked Sweet Potato Fries & Avocado Dip

This week's FNCCC chef is Ingrid Hoffmann. I had a hard time choosing which recipe I wanted to make but something about this one grabbed me so I went with it!

Sweet Potato Fries & Avocado Dip

Baked Sweet Potato Fries and Avocado Dip
Courtesy Ingrid Hoffmann

Sweet Potato Fries
Ingredients
  • 2 large sweet potatoes, peeled or unpeeled, cut into 4-inch long and 1/4 to 1/2-inch thick fries
  • 2 tablespoons olive oil, or more as needed
  • 1 teaspoon paprika
  • 1/2 teaspoon chili powder
  • 1/2 teaspoon ground coriander
  • Coarse ground rock salt and freshly ground black pepper, to taste
  • Avocado Dip, recipe follows
Directions

Preheat your oven to 450 degrees F. Line a baking sheet with aluminum foil (I find parchment works better for stuff like this) and set aside.

Place the sweet potatoes in a large bowl and toss with olive oil until the sweet potatoes are coated. Add the paprika, chili powder, coriander, salt, and pepper; toss to distribute evenly.

Arrange the coated fries in a single layer on the prepared pan. Bake for 20 minutes on the lower rack until the sweet potatoes soften. Transfer the pan to the upper rack of the oven and bake 10 minutes longer, until fries are crispy.

My oven only has one rack, so obviously I didn't switch from the lower to the upper rack. I did use the broiler for the last 10 minutes or so to make them crispy. Unfortunately that was in the mid-afternoon and by dinner they'd turned a little mushy so eat them right away if you want crispy fries!

Avocado Dip
Ingredients:
  • 1 avocado
  • 1/3 cup mayonnaise
  • 1/3 cup cream cheese
  • 1 jalapeno, seeded and chopped (I used jarred)
  • 2 scallions, white and light green part only, chopped
  • 1 lime, juiced
  • Salt and freshly ground black pepper
Place the avocado, mayonnaise, cream cheese, jalapeno, scallions, and lime juice into a blender or small food processor. Blend for 1 minute or until you have a smooth paste. Season with salt and pepper, to taste.

Serve as a dip for the Sweet Potato Oven Fries.


THE VERDICT: These were good! The dip was also really good, and it tasted even better the second day. I think next time I make it (and there will be a next time) I'll try subbing sour cream (maybe yoghurt) for the mayonnaise. This would make a good chip or veggie dip too. Four thumbs up on this one!

Related Posts with Thumbnails