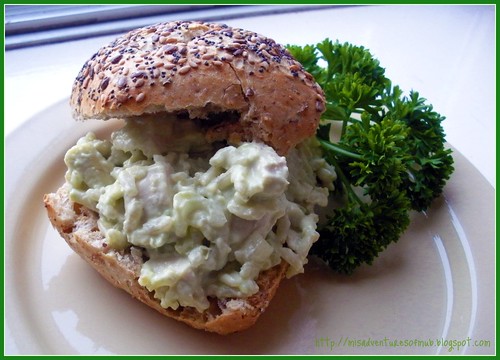
When you click on this weeks FNCCC chef and then select "low-calorie" or "low-fat" only 10 of over 1200 recipes pop up. Can you guess who it is? Paula Deen! I made her Banana Pudding last fall, so I decided to do a more savory dish this time. I made some alterations, so watch for my notes in italics.
Avocado Chicken Salad
Courtesy Paula Deen
Ingredients
Salad:
3 cups cooked, diced chicken
3 cups cooked white rice
2 avocados, peeled, diced, and tossed with 1 tablespoon lemon juice
3/4 cup chopped onion (I used one very small onion)
1 cup mayonnaise (Since the dressing below also includes 1 cup of mayo, I completely left this out)
1 to 2 teaspoons pepper (I went for a few grinds of freshly ground)
1 teaspoon salt
1/4 cup chopped fresh parsley leaves
Thick, crusty bread, multi-grain or sourdough, for serving
Lemon wedges, for garnish (I'm just not that fancy so I didn't garnish mine with lemons!)
Avocado Dressing:
1 large avocado, peeled and mashed with 2 tablespoons lemon juice
1 cup mayonnaise (I used yogurt mayo and probably only did about 3/4 cup)
1/2 cup sour cream
1/2 teaspoon Worcestershire sauce
1/3 cup chopped onion
2 cloves garlic, minced
1 teaspoon salt
Dash cayenne pepper
Directions
Dressing:
Place all ingredients in a food processor and blend until smooth. Chill and serve alongside chicken salad. (I mixed this in with the salad itself instead of serving on the side)
Salad:
Mix all ingredients and chill. Pass with avocado dressing (again, I mixed the dressing into the salad because I ditched the mayo in the first group of ingredients). Serve on the crusty bread.
THE VERDICT: We both liked this. It's a bit different but not too bad! I think I'll use a bit of vinegar in the dressing next time because it was a little sweeter than I expected. I think that if I'd used regular mayo that wouldn't have been an issue though, so keep that in mind. It also could've been due to the fact that I forgot to salt the dressing and was just salting the salad afterwards.
Wednesday, March 31, 2010
Thursday, March 25, 2010
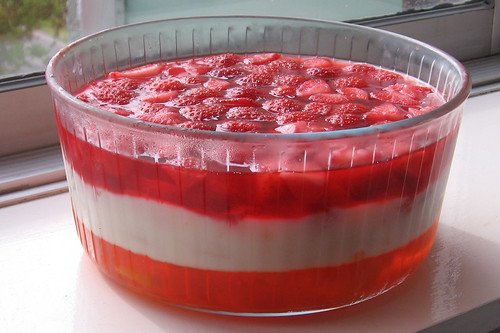
Layered Jello Fruit Salad
If you ask me what my favorite food is, I will tell you JELLO! There is just something about it's jiggly goodness. I amass a stockpile every time I go home since I can't get a sugar free version here. If you feel like donating some to the cause, I'll give you my address! Just kidding... sortof.
Layered Jello Salad
1 pkg Orange Jello
1 pkg Mixed Fruit Jello
2 cups vanilla yogurt (approx 1/2 a liter)
1 packet unflavored gelatin
500 grams strawberries
2 bananas
1 small can pineapple tidbits
Prepare the orange Jello according to the package directions, but use 1 3/4 cup water instead of two cups. This will make for a slightly firmer set. Pour into the bottom of your nice clear bowl and refrigerate for an hour or so. Carefully mix in the pineapple tidbits and let set until completely firm (2-3 hours).
Mix the unflavored gelatin in with the yogurt (follow the packet instructions for dissolving it first). You can skip this step, but it just makes it firm up better and if you're traveling with it it won't completely fall apart! Next, pour about a cup of the vanilla yogurt on top of the Jello. Slice the banana into coins and layer on top of the yogurt. Then pour the rest of the yogurt on top of the bananas and put it back in the fridge until the yogurt is set.
For the final layer, prepare the Jello as you did in the first step, using 1 3/4 cup water. Set aside and let cool (not in the fridge) while you hull and slice your strawberries. You will want your Jello cool, but not so cool it starts to gel. Layer the strawberries on top of the yogurt. Then spoon the Jello over the top of your berries. This is a little tricky because if you pour in too much it will ruin your yogurt layer (if you use the gelatin in the yogurt this won't be such an issue), so go slowly. Cover and refrigerate overnight before serving.
You can use whatever fruits and Jello flavor combinations you want. I think it would be fun to do a blue layer for a red white and blue salad.
*****
I'm participating in Mrs. Matlock's Alphabe-Thursday! Click the link below to see what other jolly jubilant joyful things people have posted about.Wednesday, March 24, 2010
BBQ Nachos
I made Neelys' Barbeque Nachos for the Food Network Chef's Cooking Challenge this week. This really sounded like a strange recipe, but I was really curious so I went for it!
Neelys' Barbeque Nachos
Recipe courtesy The Neelys
Ingredients
1 bag tortilla chips
1/2 cup Neelys Barbecue Seasoning, recipe follows (check the notes on the following recipe)
6 ounces chopped pork, beef or chicken (I used ground beef because it's what I had)
4 ounces Neelys Barbecue Sauce, recipe follows
4 ounces nacho cheese, melted (I made my own)
1 (4-ounce) can sliced jalapeños, drained (optional- if your cheese is hot enough you probably don't need these)
Directions
Mound tortilla chips in a pile on a platter. Sprinkle with Neelys Seasoning. Spread chopped pork, beef or chicken on top of chips. Sprinkle with seasoning again and pour the Neelys Barbeque Sauce onto meat. Top with the melted nacho cheese.
Lightly sprinkle more Neely's Barbeque Seasoning onto cheese. Top with jalapeños for additional spice.
3/4 cup white sugar
1 1/2 cups paprika
3 3/4 tablespoons onion powder
Mix all ingredients together and store in a tightly sealed container.
I divided this entire recipe by a factor of 6 and that really was enough to sprinkle and have a bit leftover at the end.
2 cups ketchup
1 cup water
1/2 cup apple cider vinegar
5 tablespoons light brown sugar
5 tablespoons sugar
1/2 tablespoon fresh ground black pepper
1/2 tablespoon onion powder
1/2 tablespoon ground mustard
1 tablespoon lemon juice
1 tablespoon Worcestershire sauce
In a large saucepan, combine all ingredients and mix well. Bring mixture to a boil, reduce heat to simmer. Cooked uncovered, stirring frequently every 15 minutes, for 1 hour and 15 minutes.
Yield: 3 1/2 cups
I halved the sauce recipe and it was enough for about 3 servings. I also substituted appropriate amounts of Splenda in place of the sugars. This is a very sweet BBQ sauce.
Hop on over to IBlame Thank My Mother for more FNCCC!
Neelys' Barbeque Nachos
Recipe courtesy The Neelys
Ingredients
1 bag tortilla chips
1/2 cup Neelys Barbecue Seasoning, recipe follows (check the notes on the following recipe)
6 ounces chopped pork, beef or chicken (I used ground beef because it's what I had)
4 ounces Neelys Barbecue Sauce, recipe follows
4 ounces nacho cheese, melted (I made my own)
1 (4-ounce) can sliced jalapeños, drained (optional- if your cheese is hot enough you probably don't need these)
Directions
Mound tortilla chips in a pile on a platter. Sprinkle with Neelys Seasoning. Spread chopped pork, beef or chicken on top of chips. Sprinkle with seasoning again and pour the Neelys Barbeque Sauce onto meat. Top with the melted nacho cheese.
Lightly sprinkle more Neely's Barbeque Seasoning onto cheese. Top with jalapeños for additional spice.
---
Neelys Barbeque Seasoning:3/4 cup white sugar
1 1/2 cups paprika
3 3/4 tablespoons onion powder
Mix all ingredients together and store in a tightly sealed container.
I divided this entire recipe by a factor of 6 and that really was enough to sprinkle and have a bit leftover at the end.
---
Neelys Barbeque Sauce:2 cups ketchup
1 cup water
1/2 cup apple cider vinegar
5 tablespoons light brown sugar
5 tablespoons sugar
1/2 tablespoon fresh ground black pepper
1/2 tablespoon onion powder
1/2 tablespoon ground mustard
1 tablespoon lemon juice
1 tablespoon Worcestershire sauce
In a large saucepan, combine all ingredients and mix well. Bring mixture to a boil, reduce heat to simmer. Cooked uncovered, stirring frequently every 15 minutes, for 1 hour and 15 minutes.
Yield: 3 1/2 cups
I halved the sauce recipe and it was enough for about 3 servings. I also substituted appropriate amounts of Splenda in place of the sugars. This is a very sweet BBQ sauce.
---
The Verdict: These were surprisingly good! The sweetness of the BBQ sauce with the spice of the cheese actually worked out very well. I imagine you could cut back a tad on the sweetness of the BBQ sauce, but not too much! We both said this would be a good "treat" food because if you ate it too often you'd get awfully sick of it fast, but every now and then it will be great.Hop on over to I
Monday, March 22, 2010
Menu Plan Monday- March 22, 2010
Last week was rather successful and reminded me that I feel way less stressed out when I have some idea of what dinner will entail.
I skipped on the Sauerkraut Tarts because we didn't have leftovers of what I expected we would. I've saved it to try again down the line.
I made some slight changes to the Bierock Casserole. I made them in individual triangle casserole dishes, precooked the bottom "crust," and seasoned the hamburger with some garlic and onion powder. I thought they were fab and Martijn loved them too. We're considering doing some sort of study to see if things just taste better in triangles, but I do think the recipe had something to do with it too.
The ham was nice but it didn't really caramelize like the recipe indicated. I'll probably try it again with less orange juice.
This week:
BBQ Nachos- This is my FNCCC recipe for this week. Watch for the recipe on Wednesday!
Cauliflower Cheese Pot Pies- I got two giant heads of cauliflower for cheap this weekend and this looked tasty.
Spicy Veg Fajitas- Again I can use my cauliflower, plus some of my giant stash of chickpeas.
Beefy Noodles- Maggi Mix thingie
Shoarma in Pitas- Back-up pantry/freezer meal incase something goes awry!
Thursday, March 18, 2010
Inburgering
Inburgering translates to integration in English.
When you move to The Netherlands (unless you are EU) you are required to integrate yourself into the country by learning the language and how things work. I don't think it is an entirely unreasonable requirement, but it has it's own set of problems (which I won't go into here).
When you move to The Netherlands, you are required to go through some sort of inburgering. Some municipalities will pay for it and help you arrange your courses, while others will just pat you on the head and say "good luck." Unfortunately I fell into the second group of lucky immigrants. If we'd had a little more guidance I probably would've chosen to do things a little bit differently, but as the Dutch say- helaas (alas in English). You can also opt to self study, but I'm not convinced learning a language via self study is always productive.
Luckily (or unluckily depending on how you look at it), you can apply for a student loan to help with the costs. If you are self paying (or using the loan) then you are entitled to a 70% reimbursment of your course fees (up to a certain amount) as long as you go to an "approved" school. I had the choice of two different language schools to choose from. We ended up going with the more expensive one because they actually returned our phonecalls and requests for information. The only information we could pull out of the other school was the fact that I would "need to have some classes and need to do some tests." Well, okay... WHAT classes? WHAT tests? You would've thought we were asking them for state secrets or the location of buried treasure the way they held onto information!
Anyhow...
The school I went to split things into two. First you would do an intensive Dutch course two times a week for about 16 weeks. After that you wouldbe thrown into the pits of hell start the actual "Knowledge of Dutch Society" part. The language course was absolutely wonderful and I actually feel like I learned a lot. The second part I still see as seven months of my life that I will never get back. My tormentor instructor had a grating personality that I (and apparently everyone else in my class) didn't get along with. That paired with a textbook that I thought came across as somewhat condescending in places made it really difficult for me to get through. I'll admit that part of it was attitude, but I did go into it kindof excited. As the weeks wore on my attitude got worse, but I did make an effort to begin with! If I'd known how awful it was going to be I would've opted to a different route. But again, helaas!
The "do some tests" part of the inburgering is pretty straight forward. There are four different tests you need to do. A test you do over the telephone so they can hear you speak, two tests on the computer, and a real life practical exam.
The practical exam (which I feel like I have been working on for the last 90 years) has you out and about in the world doing "Dutch" things and living to tell the tale. You must put together a portfolio of your bewijzen (proofs). I'm actually doing my volunteer work for my portfolio, though I think it's a nice thing to do anyways. Some other things include knowing how to read your electric meter, paying a bill (banking system here is totally different, but AWESOME), going to the city and registering yourself as a resident and so on and so forth. A MIRACLE fell into my lap a few weeks ago because they changed it from needing 30 proofs to just 20.
It is with great delight and joy that I announce that I'm 97%* DONE with my Inburgering! I've passed the telephone test and the two computer tests and I will be submitting my portfolio for the practical exam this weekend. Once it's accepted as being good and complete, they call me in for a test where I talk to them about some of the things I did and what I felt about doing it. I have a few interesting things to say about that, but right now I'm just going to bask in the happiness that I'm so so so close to being done!
Next step- citizenship!
*Approximately... I don't actually have an exact percentage, but I thought 97% sounds pretty close to done. I feel pretty close to done, thus the 97%. I know, I'm weird.
When you move to The Netherlands (unless you are EU) you are required to integrate yourself into the country by learning the language and how things work. I don't think it is an entirely unreasonable requirement, but it has it's own set of problems (which I won't go into here).
When you move to The Netherlands, you are required to go through some sort of inburgering. Some municipalities will pay for it and help you arrange your courses, while others will just pat you on the head and say "good luck." Unfortunately I fell into the second group of lucky immigrants. If we'd had a little more guidance I probably would've chosen to do things a little bit differently, but as the Dutch say- helaas (alas in English). You can also opt to self study, but I'm not convinced learning a language via self study is always productive.
Luckily (or unluckily depending on how you look at it), you can apply for a student loan to help with the costs. If you are self paying (or using the loan) then you are entitled to a 70% reimbursment of your course fees (up to a certain amount) as long as you go to an "approved" school. I had the choice of two different language schools to choose from. We ended up going with the more expensive one because they actually returned our phonecalls and requests for information. The only information we could pull out of the other school was the fact that I would "need to have some classes and need to do some tests." Well, okay... WHAT classes? WHAT tests? You would've thought we were asking them for state secrets or the location of buried treasure the way they held onto information!
Anyhow...
The school I went to split things into two. First you would do an intensive Dutch course two times a week for about 16 weeks. After that you would
The "do some tests" part of the inburgering is pretty straight forward. There are four different tests you need to do. A test you do over the telephone so they can hear you speak, two tests on the computer, and a real life practical exam.
The practical exam (which I feel like I have been working on for the last 90 years) has you out and about in the world doing "Dutch" things and living to tell the tale. You must put together a portfolio of your bewijzen (proofs). I'm actually doing my volunteer work for my portfolio, though I think it's a nice thing to do anyways. Some other things include knowing how to read your electric meter, paying a bill (banking system here is totally different, but AWESOME), going to the city and registering yourself as a resident and so on and so forth. A MIRACLE fell into my lap a few weeks ago because they changed it from needing 30 proofs to just 20.
It is with great delight and joy that I announce that I'm 97%* DONE with my Inburgering! I've passed the telephone test and the two computer tests and I will be submitting my portfolio for the practical exam this weekend. Once it's accepted as being good and complete, they call me in for a test where I talk to them about some of the things I did and what I felt about doing it. I have a few interesting things to say about that, but right now I'm just going to bask in the happiness that I'm so so so close to being done!
Next step- citizenship!
*Approximately... I don't actually have an exact percentage, but I thought 97% sounds pretty close to done. I feel pretty close to done, thus the 97%. I know, I'm weird.
*****
I'm participating in Mrs. Matlock's Alphabe-Thursday! Click the link below to see what other iteresting things people have posted about.Wednesday, March 17, 2010
Sock Monkey Giveaway WINNER!
I kinda wanted everyone to win this one because I got SO many fun ideas for new monkeys... but there could be only one, and the random number generator chose #14, who is:
Funnily enough, thamarai also lives in Eindhoven. So, random number generator apparently decided to keep things close to home this time!
thamarai said...
So it appears that I will be learning how to make and drape a saree. I have a suspicion I might need to do a few trial runs for this one!
thamarai, drop me an e-mail and we can discuss specifics! I'll need a few weeks to make her and then I'll get her to you! Congratulations!
P.S. I am having plans for another monkey giveaway to celebrate a "grand opening" of sorts in the next few weeks but I need to finish another rather important to my life here in The Netherlands project first. So stay tuned!
thamarai
Funnily enough, thamarai also lives in Eindhoven. So, random number generator apparently decided to keep things close to home this time!
Cutie cute! :) The blog looks awesome, seriously! A sock monkey with a saree sort of a thingy maybe..:)
So it appears that I will be learning how to make and drape a saree. I have a suspicion I might need to do a few trial runs for this one!
thamarai, drop me an e-mail and we can discuss specifics! I'll need a few weeks to make her and then I'll get her to you! Congratulations!
P.S. I am having plans for another monkey giveaway to celebrate a "grand opening" of sorts in the next few weeks but I need to finish another rather important to my life here in The Netherlands project first. So stay tuned!
Wednesday, March 17, 2010
Crunchy Pork Chops & Garlicky Spinach Tomato Salad
Nigella Lawson is this week's FNCCC chef! From browsing her recipes, I take it that she really really likes chocolate. There were some really yummy looking dessert recipes but I went another direction and did pork chops instead!
Crunchy Pork Chops with Garlicky Spinach and Tomato Salad
Courtesy Nigella Lawson
Ingredients
Pork chops:
Directions
Trim the thick white fat off the pork chops, cutting carefully around the outside edge. Lay the chops between 2 pieces of plastic wrap and, using a mallet or a rolling pin beat them until the meaty part of the chop is half as thick. You will need to beat around the bone, so turn them over once as you go. I skipped this entire process. My pork chops were already rather lean and quite thin to begin with.
Beat the egg in a shallow wide bowl with the mustard, oregano, and salt and pepper. On a large plate or platter, combine the breadcrumbs with the Parmesan.
Press each of the chops into the egg mixture, coating either side. Then dip the eggy chops (for no reason whatsoever I start giggling every time I read the phrase 'eggy chops') into the bread crumbs, covering them evenly. Let them lie on a cooling rack to dry slightly while you heat the oil in a large frying pan. When a small cube of bread sizzles if dropped into the oil, then the oil is hot enough. Cook the chops until they are a deep golden color, about 5 to 7 (or 3-4) minutes a side (depending on how thin you've managed to get them and how cold they were before going in the oil).
Meanwhile, quarter the tomatoes and take out the seeds, then cut the shells into strips and dice them. You can take off the skins, too, if you prefer, by steeping the tomatoes first into a bowl of just boiled water for 3 to 5 minutes. Combine the diced tomato, minced or grated garlic, oil, and lemon juice in a bowl, and season well with salt and pepper.
When the chops are ready, toss the spinach in the tomato mixture until well coated and divide the salad between 2 large plates, putting each chop alongside.
The Verdict: Both Martijn and I loved these! The outside of the chops was perfectly crispy and the inside was nice and tender. The salad was also wonderful. These also come together REALLY fast. I think I had dinner done in less than 20 minutes which is practically a world record for me. I highly recommend giving this recipe a try!
Hop on over to IBlame Thank My Mother for more FNCCC and Balancing Beauty and Bedlam for more Tasty Tuesday recipes!
P.S. If you missed my new blog design reveal post, go back and check it out! I'm giving away a customized sock monkey to one lucky person.
Crunchy Pork Chops with Garlicky Spinach and Tomato Salad
Courtesy Nigella Lawson
Ingredients
Pork chops:
- 2 pork chops, approximately 8 ounces each (Mine weren't that big, probably closer to 5 oz)
- 1 egg
- 1/2 teaspoon Dijon mustard
- 1/4 teaspoon dried oregano
- Salt and freshly ground black pepper
- 1 cup bread crumbs (You will only need 1 cup of bread crumbs if you also plan on breading yourself along with the pork chops! I used about a half a cup and still had oodles of waste)
- 1 tablespoon freshly grated Parmesan
- 1 cup ground nut oil or similar, for frying (I used 1/4 cup peanut oil and probably still could've used a bit less)
- 3 medium tomatoes
- 1/2 clove garlic, minced
- 1 tablespoon olive oil
- 1 tablespoon lemon juice
- 4 cups baby spinach leaves (I don't think you can even find baby spinach here, so I just used regular)
- Salt and pepper
- I added a sprinkle of freshly grated Parmesan cheese to this too
Directions
Trim the thick white fat off the pork chops, cutting carefully around the outside edge. Lay the chops between 2 pieces of plastic wrap and, using a mallet or a rolling pin beat them until the meaty part of the chop is half as thick. You will need to beat around the bone, so turn them over once as you go. I skipped this entire process. My pork chops were already rather lean and quite thin to begin with.
Beat the egg in a shallow wide bowl with the mustard, oregano, and salt and pepper. On a large plate or platter, combine the breadcrumbs with the Parmesan.
Press each of the chops into the egg mixture, coating either side. Then dip the eggy chops (for no reason whatsoever I start giggling every time I read the phrase 'eggy chops') into the bread crumbs, covering them evenly. Let them lie on a cooling rack to dry slightly while you heat the oil in a large frying pan. When a small cube of bread sizzles if dropped into the oil, then the oil is hot enough. Cook the chops until they are a deep golden color, about 5 to 7 (or 3-4) minutes a side (depending on how thin you've managed to get them and how cold they were before going in the oil).
Meanwhile, quarter the tomatoes and take out the seeds, then cut the shells into strips and dice them. You can take off the skins, too, if you prefer, by steeping the tomatoes first into a bowl of just boiled water for 3 to 5 minutes. Combine the diced tomato, minced or grated garlic, oil, and lemon juice in a bowl, and season well with salt and pepper.
When the chops are ready, toss the spinach in the tomato mixture until well coated and divide the salad between 2 large plates, putting each chop alongside.
The Verdict: Both Martijn and I loved these! The outside of the chops was perfectly crispy and the inside was nice and tender. The salad was also wonderful. These also come together REALLY fast. I think I had dinner done in less than 20 minutes which is practically a world record for me. I highly recommend giving this recipe a try!
Hop on over to I
***
P.S. If you missed my new blog design reveal post, go back and check it out! I'm giving away a customized sock monkey to one lucky person.
Monday, March 15, 2010
Menu Plan Monday- March 15, 2010
I'm trying to get back into my normal routines that I've let go by the wayside. Life is at least 70% simpler if I menu plan, and I KNOW this. Why is it so dang hard to follow-through and actually DO it!
P.S. If you missed my new blog design reveal post, go back and check it out! I'm giving away a customized sock monkey to one lucky person.
- Pasta with Salmon and Dill Sauce
- Hutspot- It's starting to warm up a little but it's still not so warm that a nice winter comfort food isn't still tasty.
- Crunchy Pork Chops with Garlicky Spinach & Tomato Salad- FNCCC recipe for this week! Watch for it on Wednesday.
- Caramelized Ham- (recipe is in Dutch) We have a little beenham in the freezer so I figured this would be a good way to use it!
- Bierock Casserole- I've never had this but it looks tasty enough.
- Sauerkraut Tarts- (recipe is in Dutch)I can use leftover sauerkraut and ham for these.
***
P.S. If you missed my new blog design reveal post, go back and check it out! I'm giving away a customized sock monkey to one lucky person.
Thursday, March 11, 2010
Het Loo
I have to admit that I'm really stretching the limitations on my "H" for this week since technically het is the Dutch equivalent of "the", but I hope that Mrs. Matlock will see that my heart is in the right place and not think of me as a rule bending heathen.
Het Loo Palace (Paleis Het Loo) was the residence of the royal family for nearly 300 years, and has now been restored into a museum and gardens for the public. You can't take pictures inside the palace itself, but check out this link to take a peek into one of the bedrooms.
The gardens of Het Loo are absolutely lovely though and you CAN take pictures out there!
This type of garden is called parterre, which is "an ornamental garden where beds and paths are arranged to form a pattern."
Immaculately trimmed scrolly hedges are surrounded by topiaries and different types of annuals and perennials which are also framed with hedges.
There are many statues and fountains throughout the gardens.
If you turn around and look back at the palace, you will see these lovely golden doors. How'd you like your back doors to look like that?!
Surrounding the garden is a massive moat of epic proportions. Okay, massive moat of epic proportions might be a bit of a hyperbole, but it sounds more impressive than "little wimpy ditch around the outer edges."
A wide variety of plants go into the gardens so that they can be enjoyed year round.
I'd really like to know where I can find seeds for an orange tree like this though!
I should mention that Loo is pronounced more like "lo" (rhymes with "though") and not "loo" (rhymes with zoo). I know better, but I say it like "loo" and giggle because I'm immature and it sounds like what Brits call the toilet. *ahem*
P.S. If you missed my new blog design reveal post, go back and check it out! I'm giving away a customized sock monkey to one lucky person.
Het Loo Palace (Paleis Het Loo) was the residence of the royal family for nearly 300 years, and has now been restored into a museum and gardens for the public. You can't take pictures inside the palace itself, but check out this link to take a peek into one of the bedrooms.
The gardens of Het Loo are absolutely lovely though and you CAN take pictures out there!
This type of garden is called parterre, which is "an ornamental garden where beds and paths are arranged to form a pattern."
Immaculately trimmed scrolly hedges are surrounded by topiaries and different types of annuals and perennials which are also framed with hedges.
There are many statues and fountains throughout the gardens.
If you turn around and look back at the palace, you will see these lovely golden doors. How'd you like your back doors to look like that?!
Surrounding the garden is a massive moat of epic proportions. Okay, massive moat of epic proportions might be a bit of a hyperbole, but it sounds more impressive than "little wimpy ditch around the outer edges."
A wide variety of plants go into the gardens so that they can be enjoyed year round.
I'd really like to know where I can find seeds for an orange tree like this though!
I should mention that Loo is pronounced more like "lo" (rhymes with "though") and not "loo" (rhymes with zoo). I know better, but I say it like "loo" and giggle because I'm immature and it sounds like what Brits call the toilet. *ahem*
*****
I'm participating in Mrs. Matlock's Alphabe-Thursday! Click the link below to see what other hopefully happy things people have posted about.***
P.S. If you missed my new blog design reveal post, go back and check it out! I'm giving away a customized sock monkey to one lucky person.
Wednesday, March 10, 2010
Chicken Pinwheels
I had to look HARD this week or a recipe that I wanted to make. I'm suffering from "lack of motivation to do anything lately" syndrome. It'll pass, but it's making feeling excited about cooking hard right now. I did actually cook for last week's challenge, but I was suffering from "lack of motivation to post about it" syndrome. It'll go up at some point in the future, because the pictures are sitting here staring me in the face saying "Why didn't you love me enough to post about me?"
Anyhow, now that that blathering is out of the way I'll get to the point! I made Michael Symon's Chicken Pinwheels for the FNCCC this week. I had my eyebrows raised at some of the ingredients (pickles?) but decided to go for it. The recipe is for 8, but I only cooked for the two of us.
Ingredients
8 boneless skinless chicken breasts
6 ounces sliced ham
8 ounces smoked bacon
4 eggs beaten
3 diced pickles (dill, sweet, or sours, your preference)
1/2 cup butter
3 tablespoons flour
2 cups chicken stock
2 tablespoons chopped tarragon (I used dried and added it into the sauce before putting things in the oven instead of as a garnish at the end)
Directions
Place chicken in between plastic wrap and pound out until 1/4-inch thick (I rather enjoy using my meat mallet for such things). Place 1 slice of ham and 1 slice of bacon onto each breast of chicken. Lightly scramble the eggs and let cool. Divide eggs evenly over chicken and spread out. Top with diced pickles and roll into pinwheels. Once chicken is rolled, tie with string to secure (Unwaxed dental floss or... undyed cotton crochet thread works if you don't have kitchen twine). Heat the butter in a saute pan and brown chicken rolls. Remove chicken rolls from the pan and set aside. Add flour to the same saute pan, and cook until light brown. Add the chicken stock, making sure to stir out any lumps. Return chicken to pan and place in a preheated 350 degree oven for 1 hour (I think 1 hour is too long. It might've been because I was only baking two rolls, but I took them out after about 40 minutes and they were well on their way to being VERY dried out). Remove from oven and sprinkle with chopped tarragon. Slice each breast into 4 pieces and serve with 2 tablespoons of sauce.
The Verdict: We both liked these. I was actually suprised how well they turned out. The stock I used was a tad on the salty side, but that's fixable. Also the cooking time needed to be tweaked a little but in all it's a pretty good recipe!
Thanks to Sarah at IBlame Thank My Mother for hosting The Food Network Chef's Challenge every week!
P.S. If you missed my new blog design reveal post, go back and check it out! I'm giving away a customized sock monkey to one lucky person.
Anyhow, now that that blathering is out of the way I'll get to the point! I made Michael Symon's Chicken Pinwheels for the FNCCC this week. I had my eyebrows raised at some of the ingredients (pickles?) but decided to go for it. The recipe is for 8, but I only cooked for the two of us.
Ingredients
8 boneless skinless chicken breasts
6 ounces sliced ham
8 ounces smoked bacon
4 eggs beaten
3 diced pickles (dill, sweet, or sours, your preference)
1/2 cup butter
3 tablespoons flour
2 cups chicken stock
2 tablespoons chopped tarragon (I used dried and added it into the sauce before putting things in the oven instead of as a garnish at the end)
Directions
Place chicken in between plastic wrap and pound out until 1/4-inch thick (I rather enjoy using my meat mallet for such things). Place 1 slice of ham and 1 slice of bacon onto each breast of chicken. Lightly scramble the eggs and let cool. Divide eggs evenly over chicken and spread out. Top with diced pickles and roll into pinwheels. Once chicken is rolled, tie with string to secure (Unwaxed dental floss or... undyed cotton crochet thread works if you don't have kitchen twine). Heat the butter in a saute pan and brown chicken rolls. Remove chicken rolls from the pan and set aside. Add flour to the same saute pan, and cook until light brown. Add the chicken stock, making sure to stir out any lumps. Return chicken to pan and place in a preheated 350 degree oven for 1 hour (I think 1 hour is too long. It might've been because I was only baking two rolls, but I took them out after about 40 minutes and they were well on their way to being VERY dried out). Remove from oven and sprinkle with chopped tarragon. Slice each breast into 4 pieces and serve with 2 tablespoons of sauce.
The Verdict: We both liked these. I was actually suprised how well they turned out. The stock I used was a tad on the salty side, but that's fixable. Also the cooking time needed to be tweaked a little but in all it's a pretty good recipe!
Thanks to Sarah at I
***
P.S. If you missed my new blog design reveal post, go back and check it out! I'm giving away a customized sock monkey to one lucky person.
Tuesday, March 09, 2010
The Big Reveal & A Giveaway!
Giveaway is now CLOSED! Thanks to all who entered.
After weeks of much hair pulling and becoming more intimately involved with CSS and HTML than I ever wanted to be, I am ready to reveal my super secret project- My new blog design!
In order to celebrate the new monkey-tasticness of it, I've decided to giveaway a monkey to one of you lucky lucky people. Even better, I will customize him (or her) especially for you! What YOU need to do is tell me what type of monkey you'd ask for if you won.
Need some ideas?
I've also found some new fuzzy socks to make monkeys from!
Again, to enter all you need to do is comment on THIS post (if you're reading via the RSS feed, click through and make sure to comment on the post) and tell me what kind of monkey you'd like if you won. If it's wildly complex, you might need to give me some time to work my magic! I'll ship worldwide and use the random number generator to pick a winner. Giveaway ends March 17, 2010.
Good luck!
Thursday, March 04, 2010
Green Gorgeous Giethoorn
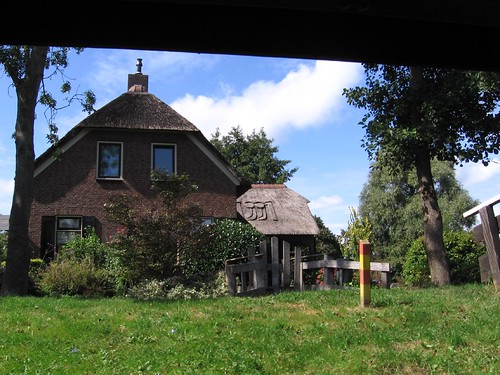
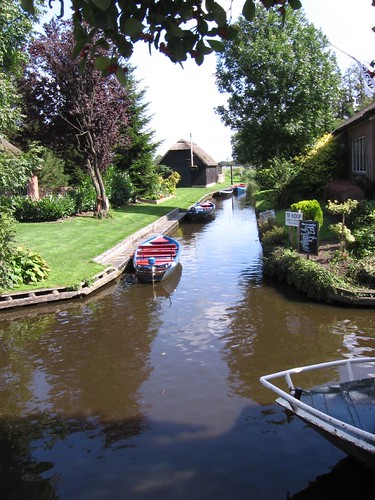
Giethoorn is a village in the province of Overijssel. It literally means "goat horn," and was named that way because the first settlers found masses of goat horns everywhere in the area. It's referred to as the "Venice of the North" because there are no roads in the center of the village.
People park their cars and hop into a boat to make their way into the center of the village.
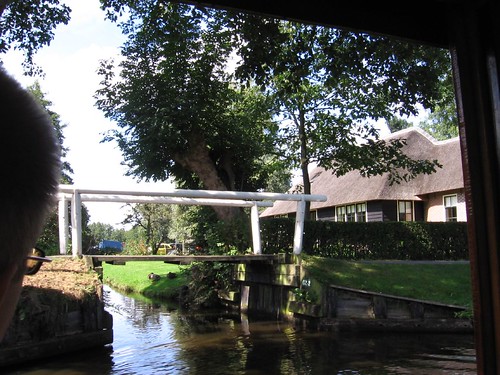
All of the homes have thatched roofs which kindof makes it a fairytale-like village to wander through.
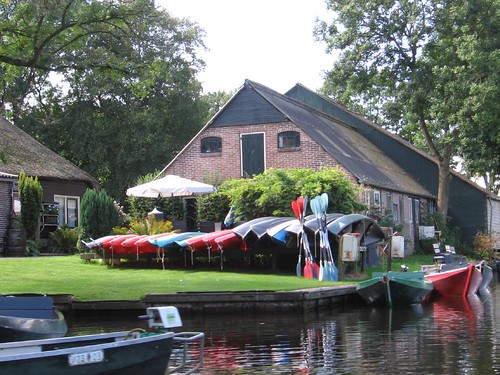
The homes are pretty much right on the waters edge. I'd always be worried I was going to drop the lawnmower in the canal if I lived here.
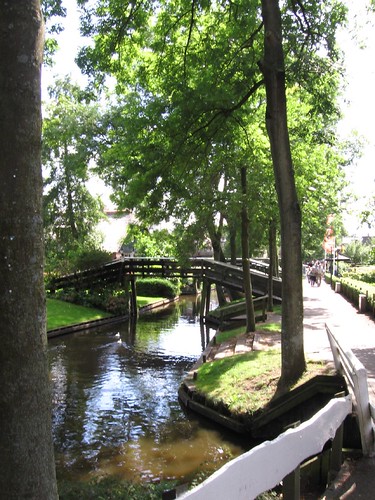
Here you can see one of the canal "streets."
Boats galore!
You CAN get around via the footpaths and footbridges in the village if you don't have a boat and don't feel like going for a swim (you can't really swim, the canals are only about 1 meter deep).
I think that it's quite a picturesque place to visit, though there really isn't a whole lot to do other than ride the canal boat and take some nice pictures. I don't know that I would make a trip JUST to go there, but if you're nearby I'd say it's worth a peek!
*****
I'm participating in Mrs. Matlock's Alphabe-Thursday! Click the link below to see what other great goodly things people have posted about.