Monday, January 31, 2011

Menu Plan Monday, January 31, 2011

Recap of last week:
The Chicken Broccoli Bake was unmemorable. I won't make it again. The Ground Beef, Spinach & Egg Scramble on the other hand was fab. Martijn is already planning on making it for his dinner night in a couple of weeks. I didn't get to the Hamburger Buddy so it'll carry over into this week. The other recipes were ones I have made before and knew we liked so we don't need to discuss them!


On the menu for this week:

Hamburger Buddy

Tortilla Pie

Cod Croquettes

Sweet Potato Hash & Spicy Chicken Strips

My plan was to make the Sweet Potato Hash for the NAWC potluck lunch tomorrow but there was an incident with the bacon cups not being very cuplike so we ate it for dinner and now I'm scrambling for plan B... at 10:46 PM. Good thing the store opens in the morning at 7!

Wednesday, January 26, 2011

How to Make Potstickers

I don't usually do step-by-step photo recipe posts because they're time consuming and tricky. And lets be honest here- I'm just plain lazy. This is just one of those things that works better with a little visual help.

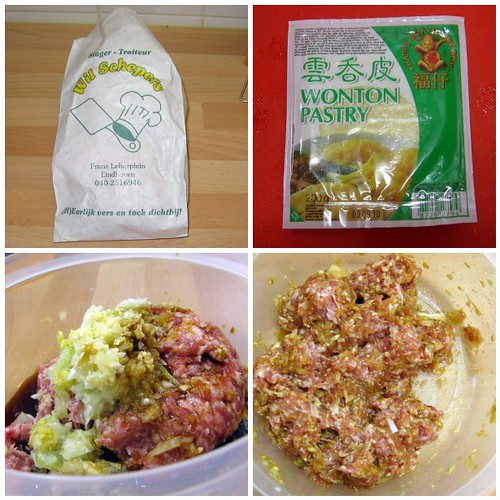
I buy my won ton wrappers from one of the oriental stores here. They are usually in the frozen section, and cost anywhere between 1-1.50€ (200g package). They do have round "pot sticker" wrappers, but I haven't found those here and the square ones work just fine. You can make your own, but unless you've got a pasta machine that can roll things really thin, I don't recommend it. It's a -lot- of work. I bought the pork from the local butcher. Ground beef will work too, but I like the taste of pork better in these. I've used half and half (which is readily available in the regular supermarkets here), but again, I prefer all pork.

You will need:
250 grams (approx 1/2 lb) ground pork
1/2 onion
2 garlic cloves
1" fresh ginger
2 tbsp soy sauce
1 tbsp sesame oil
25ish won ton wrappers

Potsticker HowTo 1


Gather up your ingredients. Laugh at the funny picture on the bag from the butcher.

Mince the garlic, grate the ginger, and mince the onions. If you have a food processor or chopper, I highly recommend using it since you want things to be quite small. Mix the pork, garlic, ginger, onions, sesame oil and soy sauce together. It's best if you let it sit for an hour or so before you continue, but if you're really hungry you can just go ahead ;)

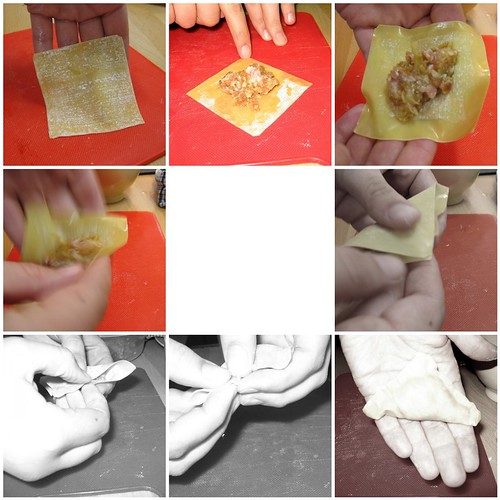
Fill a small dish with some water. You're going to use this to moisten the outer edges of the won ton wrapper so that it'll seal properly. Pull out one of the wrappers and put about a tablespoon of the filling in. You don't want to overfill them because they might come unsealed when you're boiling them later. Wet your finger and run it around the outside edge of the wrapper. Fold it in half so that it becomes a triangle, and pinch the edges closed. Make sure it's sealed well.

Potsticker HowTo 2


Put the assembled pot sticker on a plate and cover with a towel. Continue the process until you've used all of your meat mixture. This recipe will make about 25, give or take a few.

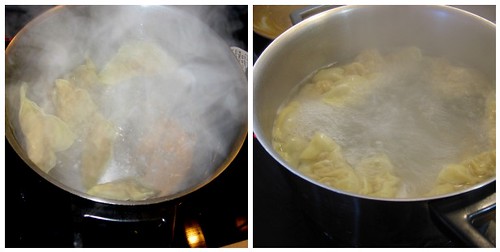
Fill a good sized pot with water and bring to a boil. Drop the pot stickers in the water 5 or 6 at a time. I wait until they float to the top and then cook another minute or two. Remove the pot stickers from the boiling water with a slotted spoon (let the water drip off) and continue the process until all of them are cooked.

Potsticker HowTo 3


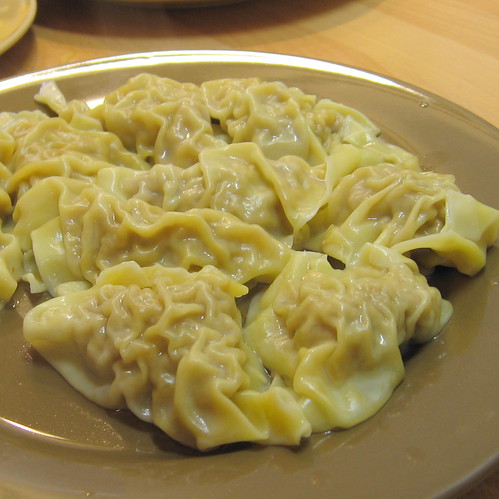
If you've sealed your pot stickers properly, they'll come out of the pan looking like this:
potsticker16


If you didn't seal them properly, they'll come out of the pan looking like this:
potsticker17

See? They're a little floppy and waterlogged. They'll taste still taste okay, but if you choose to fry them they're a little more fiddly to deal with and tend to fall apart.

Finally, if you choose, you can fry them in some vegetable or sesame oil until the outsides are just slightly browned. I usually skip this step because they are really good without it, but if you like crunchy pot stickers then go ahead.

potsticker18


There are lots and lots of recipes online for dipping sauces, but I think if you put the right ingredients inside them you don't need the extra sauce.

If you want to get really creative, you can try these different methods of folding the wrappers.
*****

This week P is for potstickers! Make sure to go check out the other fantastic participants by clicking on the picture below!

Jenny Matlock

Monday, January 24, 2011

Menu Plan Monday - January 24, 2011

Last Week's Recap:
Okay, I was pretty psyched about trying out the "multigrain crust" for the pizza that I made on Friday... and I think I probably won't make it again. It wasn't gross but it wasn't really that good either so I think I'll just keep searching for the perfect crust!

As for the poached fish with mango salsa and coconut cilantro rice... I'd make some changes! The flavors were all good (except the white pepper on the fish, it just completely took over everything) but the methods didn't wow me. I'd bake the fish. Then I'd pre-cook the rice and then add in the extra goodies. I wouldn't use sweetened coconut and I'd make 10X as much mango salsa!


On the menu for this week:

One Dish Chicken Broccoli Bake

Hamburger Buddy

Ground Beef, Spinach & Egg Scramble

Hamburgers and Sweet Potato Fries

Roasted Garlic Mash & Pork Chops

What're your meal plans for the week?

Thursday, January 20, 2011

Ode to Orange

Ode to Orange

Martijn accuses me of having an unhealthy obsession with orange. I maintain there is nothing unhealthy about loving such a cheerful color!

Nothing unhealthy about writing a haiku about a color, right? I mean people write haikus about stranger things I'm sure!

Ode* to Orange

orange everywhere

bright and beaming like the sun

always makes me smile

*I know a haiku doesn't -really- represent an ode but just play along with me... because an oaiku to orange would be ridiculous, ya?
*****

This week O is an Ode to Orange! Make sure to go check out the other fantastic participants by clicking on the picture below!

Jenny Matlock

Monday, January 17, 2011

Menu Plan Monday - January 17, 2011

Last week the only new recipe I tried was the Boerenkoolquiche (curly kale quiche) and I thought it was pretty good! It was pretty quick to put together too, so I think I'd make it again.


Up for this week:

Spinach Pizza- I'm really more interested in the "multigrain crust" of this recipe than anything else, though the topping does sound tasty too.

Split Pea Soup

Poached Fish with Mango Salsa and Coconut Cilantro Rice- This has a lot of components but it really looks tasty. Plus I have just about everything I need for it.

Thai Chicken & Shrimp Coconut Soup- I got this recipe from one of the ladies in the North American Women's Club. She made it for January's meeting and it was FANTASTIC. I hope mine turns out yummy too!

Thursday, January 13, 2011

N is for...

N is for... no ideas...

Actually, the no ideas thing isn't completely true. I had an idea but when I went through my photos I was sad to discover that I have NO pictures of what I wanted to post about.

So, I drew a picture. My drawing capabilities are pretty much nonexistant, as evidenced by previous posts. But I wanted to give it a go! I felt like I needed to post about this one thing. I had the idea in my head and nothing else could possibly be as good as this one thing!

N is for...

neushoorn

Can you tell what it is?!

Look harder, I know you're smart enough to figure it out...

.
.
.

If you said rhinoceros you would be speaking the wrong language. In Dutch it's called a neushoorn (literally, nose horn).


*****

This week N is for Neushoorn! Make sure to go check out the other (probably more sane and coherant) participants by clicking on the picture below!

Jenny Matlock

Monday, January 10, 2011

Menu Plan Monday- January 10, 2011

I've been writing my menus the past few weeks but not posting them. I was worried they were too boring BUT I've had several people harass me about why I stopped posting them so I'm going to try to get back into the groove again.


This week should be extra easy since Martijn is having a company dinner on Wednesday and he'll be cooking for his dinner group on another day.

Bolognese Bake- This is tasty and quick.

Shoarma in Pitas

Boerenkoolquiche (recipe in Dutch)- Curly kale quiche with smoked sausage. Hopefully it'll be tasty, I've been having more misses than hits with the Albert Heijn recipes lately.

What are YOU eating this week?

Thursday, January 06, 2011

M&M (un)Mixing Machine

I thought since it was M this week, the Marvelous Martijn would be a great guest poster. Enjoy!

*****

Mr. Jummy insisted I should write about "Mistress Mub, Mischievous & Mean Mugger of Marvellous & Mouthwatering Muffins" - he feels like he missed out on them for some strange reason - but considering I'm your friendly neighbourhood guest-writer (and considering that I'd like to remain married), I think I'll pass.

Instead, I'll talk a bit about a pet project from work. I'm working for a small company that writes (among other things) software for fruit and vegetable grading machines like this one (links to a video by one of our customers, and it's a bit long and windy. Feel free to skip through it - "our stuff" starts at about 2:20). We do the "machine vision" part of it - where produce on a conveyor belt passes camera's. A computer then takes images, and grades them on things like size, colour, weight and quality. The 3D-model is one of my creations.

Anyway, as you can see, these machines are far from dainty. Plus they're LOUD. This creates a bit of a problem for trade shows. You can't really put one of these machines on a stand; it'd be impractical at the very least. For a few years, we've been jokingly saying that we need a small scale model of a grading machine, sorting something small like M&M's. Being the geeks we really are, it would be awesome if it'd be made out of Lego. So, a few years ago, I went on a research trip to the M&M factory in Las Vegas.

Market Research

In the mean time, one of my coworkers figured out exactly which Lego kits to buy, and started working on a prototype. After more hours than I'd like to admit, we finally finished it. (Yes, we're being paid to play around with Legos. Yay us!)


It actually works - and runs essentially the same software as that big machine of the youtube movie linked above. You can see it (and me and my coworkers) in action:


(If that doesn't work, try here.)

P.S.: I do need to point out that while I'm getting paid to eat M&M's and play with legos, the beverages aren't commonly part of the deal. Only sometimes...

*****

This week M is for M & M (un)Mixing Machine! Make sure to go check out the other participants by clicking on the picture below!

Jenny Matlock

Tuesday, January 04, 2011

Cranberry and Cream Cheese Muffins

Santa gave me the January 2011 BBC Good Food magazine and these Cranberry & Cream Cheese Muffins were one of the first things that caught my eye! I made the first batch as the recipe was written and whipped up a second batch with a few changes. I think you could probably do these entirely in whole wheat flour, but I just did slightly less than half (since it's a more dense flour).

Cranberry & Cream Cheese Muffins

Cranberry & Cream Cheese Muffins
Adapted from BBC Good Food

100 g cream cheese
200 g sugar
175 g cranberries
100 g flour
90 g whole wheat flour
2 tsp baking powder
Pinch of salt
3 eggs (the eggs I've been getting are rather small, so you might just want to use two if you have large or XL eggs)
75 ml sunflower oil
1 tsp vanilla extract

Line a 12-hole muffin tin with muffin papers.

Beat the cream cheese with 25 grams of the sugar and set aside.

Heat the cranberries with 25 grams of sugar until they start to pop and break down a bit (around 5 minutes). Mash them lightly with the spoon and set aside to cool.

Sift the flours into a bowl and add remaining 150 grams sugar, baking powder, and salt.

Add eggs, oil, vanilla, and mashed cranberries to the dry ingredients and stir together. It will be a really thick and gloopy.

Divide the batter between the 12 muffin papers, but leave a little bit to cover up the cream cheese at the end (about a tbsp per muffin).

Make a small well in the center and drop in a blob of the cheese mixture. Drop a little bit of of the reserved batter on top of the cream cheese.

Bake at 175 C for 25-30 minutes. Cool on a wire rack.


*****

Be sure to swing by and visit Balancing Beauty and Bedlam for more Tasty Tuesday recipes!
Related Posts with Thumbnails